
Anúncios
A topographic map shows more than where the trail goes.
It shows the shape of the land itself: every hill, valley, cliff and saddle,
drawn with thin lines that turn a flat sheet of paper into a three-dimensional picture once you learn to read them.
Anúncios
That picture is what keeps you found.
When you can match the ground around you to the lines on the map,
a missed junction or a faint trail becomes a small puzzle instead of a crisis.
Here is how to read one, step by step.
What Makes a Map Topographic
A road map shows routes. A topographic map shows terrain, using contour lines to represent elevation.
Each contour line connects points at the same height above sea level, so if you walked along one, you would never go uphill or downhill.
That simple idea lets you see how steep a trail is before you set foot on it,
where it climbs and descends, and which landmarks you should pass along the way.
Paper topographic maps are available for most hiking areas, and many phone apps display the same contour information.
Start With the Margins
Before you look at the trail, read the edges of the map.
The margins hold the information that makes everything else make sense:
- Scale: Tells you how map distance relates to ground distance. On a 1:24,000 map, common for US hiking areas, one inch equals 2,000 feet. On a 1:25,000 map, widely used in the UK and many other countries, four centimeters equals one kilometer.
- Contour interval: The vertical distance between contour lines, such as 40 feet or 10 meters.
- Legend: Explains the symbols and colors, which vary between publishers and countries.
- North arrow and declination: Shows true north and the difference between true north and magnetic north for that area.
- Date: Tells you how current the map is. Trails, roads and forest cover can change.
A useful habit is to measure your route with a piece of string or the edge of your compass,
then convert it with the scale bar. It gives you a far better sense of distance than eyeballing it.
Understanding Contour Lines
Contour lines are the heart of a topographic map.
Most maps include darker, thicker lines called index contours, usually every fifth line, with the elevation printed on them.
The thinner lines in between follow the contour interval.
The spacing between lines tells you the steepness. Lines packed tightly together mean the ground rises or falls quickly.
Lines spread far apart mean gentle slopes or flat ground, and where lines merge or nearly touch, expect a cliff.
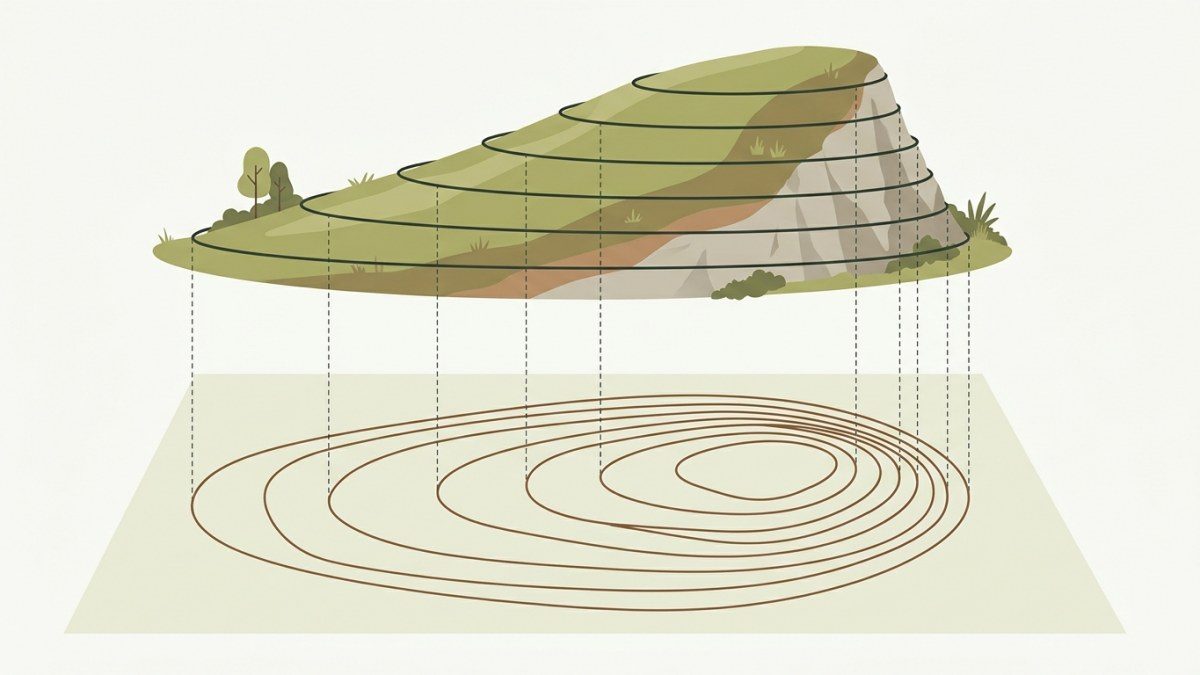
You can also use contours to estimate how much climbing a hike involves.
Count the lines your route crosses going uphill and multiply by the contour interval.
If you cross 25 lines on a map with a 40-foot interval, you will climb about 1,000 feet,
and knowing that in advance helps you plan your time and energy.
Reading Landforms From Contour Shapes
With a little practice, the shapes of contour lines become recognizable features. This table covers the most common ones:
| What the contours look like | What you will find on the ground |
|---|---|
| Small closed loops nested inside each other | A hilltop or summit |
| V or U shapes pointing toward higher elevation | A valley, gully or stream drainage |
| V or U shapes pointing toward lower elevation | A ridge or spur |
| An hourglass shape between two high points | A saddle or pass |
| Lines crowded together or merging | A very steep slope or cliff |
| Lines widely spaced | A gentle slope, bench or flat area |
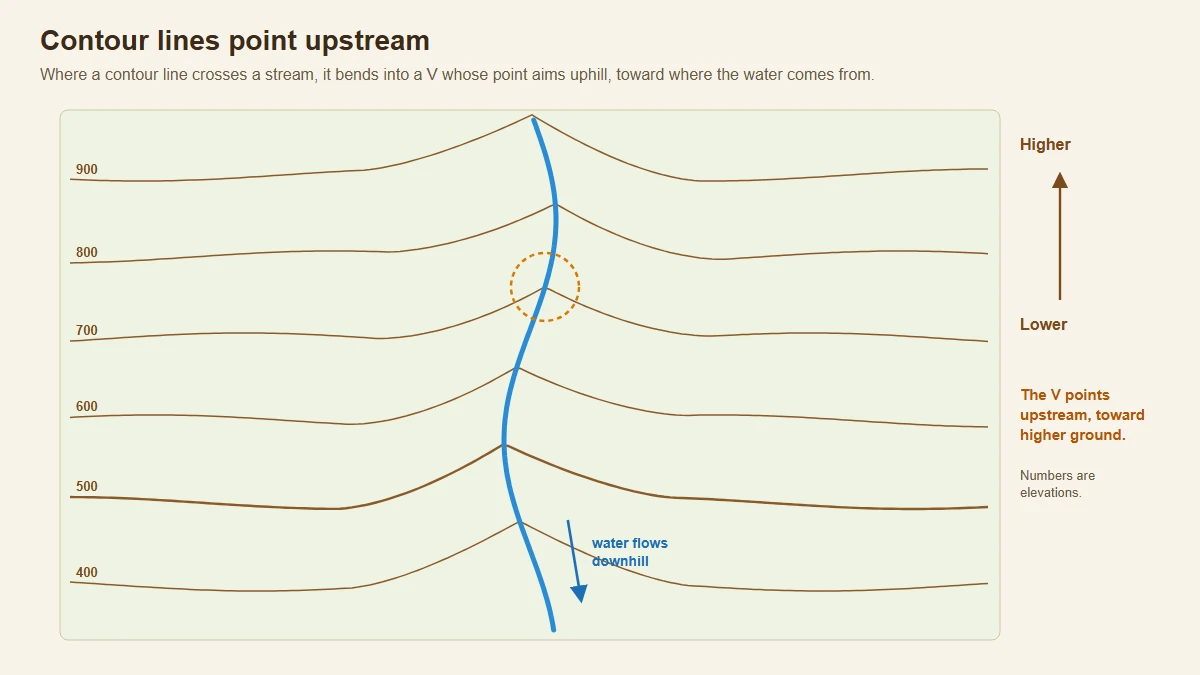
One handy rule: where contour lines cross a stream, they bend into a V that points upstream.
If you are unsure which way water flows on the map, the V tells you.
Colors and Symbols
On many topographic maps, including standard US government maps, brown lines show contours, blue shows water,
green shows forest or dense vegetation, and white shows open areas.
Black typically marks human-made features such as buildings, roads and many trails, which are often drawn as dashed lines.
Other publishers and countries use their own color schemes and symbols, so always check the legend of the map in your hand.
Pay particular attention to how trails, private land boundaries, seasonal streams and campgrounds are marked.
Orient the Map and Pinpoint Your Location
A map is easiest to read when it is oriented, meaning turned so that north on the map points to north in the real world.
Then everything on the map lines up with what you see, and the lake on the left side of the map is on your left.
You can orient a map in two ways.
With a compass, lay it on the map, allow for declination as your compass instructions describe,
and rotate map and compass together until the needle lines up with north on the map.
Without a compass, turn the map until obvious features line up, such as a long ridge, a lakeshore or a river valley.
To keep track of where you are as you walk, use these techniques:
- Thumb the map: Fold it so your route is visible and keep your thumb on your current position, moving it as you go.
- Tick off features: Note each stream crossing, junction, saddle or change in slope as you pass it.
- Use handrails: Linear features such as streams, ridges or power lines that run alongside your route help confirm you are on track.
- Know your backstop: Pick a feature beyond your next target, such as a river or road, that tells you when you have gone too far.
Common Map-Reading Mistakes
Most navigation errors come from a handful of simple slips. Watch out for these:
- Mixing up scales: Switching between maps of different scales changes how much ground an inch or a centimeter covers. Check the scale every time you pick up a new map.
- Assuming the same contour interval: A map with a 20-foot interval makes terrain look far steeper than one with an 80-foot interval. Read the margin before judging a slope.
- Forcing the map to fit: When you want to be somewhere, it is easy to convince yourself that a random bump is the hill on the map. If two or three features do not match, assume you are wrong and stop to reassess.
- Waiting until something feels wrong: By the time you notice, you may be well past a junction. Check the map regularly, even when the trail seems obvious.
- Relying on an old map: Trails get rerouted and new roads appear, so use a recent edition and compare it with current trail information.
Practice Before You Need It
Map reading is a skill, and skills fade without use. Start on familiar trails, where mistakes are harmless.
Before a hike, study the map and predict what you will see,
such as a steep climb after the second stream,
a saddle with views to the east or a long flat stretch along a bench.
Then check your predictions on the trail.
At viewpoints, try to identify peaks, valleys and lakes on the map.
Time yourself between landmarks to learn your pace on different slopes.
If you want structured practice, local orienteering events and navigation courses are an excellent way to build confidence.
Read the Land, Not Just the Map
A topographic map rewards a few minutes of study before the hike and a quick glance at every junction during it.
Learn the margins, understand contour spacing and shapes, keep the map oriented and your thumb on your position, and practice until it feels natural.
Carry a paper map even if you use a phone app, and you will always have a way to find your way home.
Sources and Further Reading
This article was reviewed by the BraverPlay editorial team against the official sources below. Rules, conditions and gear vary from place to place, so always check the latest guidance from local authorities before you head out.
- What is a topographic map?, U.S. Geological Survey: What contour lines are and how they show the height, shape and steepness of the land.
- Topographic Mapping, U.S. Geological Survey: The 1:24,000 scale, where 1 inch on the map represents 2,000 feet, and the colors used for contours, water and woodland.
- US Topo Cartographic Specifications - Elevation, U.S. Geological Survey: Index contours drawn as thicker brown lines every fifth contour and labeled with the elevation, with thinner lines at the contour interval.
- Orienting a Topographic Map, Natural Resources Canada: Orienting a map with a compass using the declination shown in the margin, or by lining it up with a landmark you can identify.