
Anúncios
A blister can turn a beautiful hike into a slow, painful shuffle back to the car.
The good news is that most blisters are preventable, and even the ones that sneak through can usually be stopped before they get bad.
Prevention comes down to managing three things: friction, moisture and heat.
Anúncios
Below you will find how blisters form, how to set up your footwear and socks,
and exactly what to do the moment something starts to rub.
Why Blisters Form
A friction blister starts when skin is pushed back and forth against a shoe or sock over and over.
The outer layers of skin shift against the deeper layers, fluid collects in the gap, and a bubble forms.
Moist skin is softer and more fragile, and heat makes the problem worse, which is why long,
warm days and sweaty or wet feet are the classic setup.
Common trouble spots include the back of the heel, the tops and tips of the toes,
the ball of the foot and the outside of the little toe.
If you know where you usually blister, you can protect that spot before you start.
Start With Footwear That Fits
No sock or tape can fully fix a shoe that does not fit.
Your heel should stay mostly in place as you walk, your toes should have room to wiggle,
and your foot should not slide forward and hit the front on descents.
Pressure points you notice in the first few minutes of wearing a shoe tend to become blisters after a few hours.
Break in new footwear with short walks before a long hike, and do not assume an old favorite still fits the same way.
As cushioning wears down and insoles pack flat, a familiar pair can start rubbing in new places.
Swapping worn insoles for fresh ones sometimes restores a good fit.
Choose Socks That Work for Your Feet
Socks are your first line of defense.
Hiking socks made of wool, synthetic fibers or a blend move sweat away from your skin and cushion high-pressure areas.
Cotton socks soak up sweat and hold it against your skin, which makes blisters far more likely.
- Fit: Socks should be snug with no bunching or wrinkles, and the heel pocket should sit squarely on your heel.
- Thickness: Match the cushion to your footwear. A thick sock in a snug shoe can cause pressure, while a thin sock in a roomy boot can allow sliding.
- Seams: Look for flat or seamless toes, especially if you blister on the tops of your toes.
- Liners: Some hikers wear a thin liner sock under a hiking sock, so rubbing happens between the two socks rather than against the skin.
- Toe socks: Socks with individual toe pockets can help if you get blisters between your toes.
Always pack a dry spare pair.
Changing into fresh socks halfway through a long or wet hike is one of the easiest ways to protect your feet.
Prepare Your Feet Before the Hike
Trim your toenails a day or two before a hike, cutting straight across and smoothing sharp edges.
Long nails push into the front of your shoe on descents and can rub neighboring toes.
Keep calluses from building hard, thick edges, since blisters can form underneath them.
If you have a known trouble spot, protect it before it gets hot.
Smooth athletic tape or a thin adhesive blister dressing applied to clean, dry skin can prevent rubbing all day.
Round the corners of the tape so it does not peel, and keep it free of wrinkles,
which can cause the very problem you are trying to prevent.
Some hikers use anti-friction balms or lubricants on areas that rub, while others with very sweaty feet prefer foot powder to keep skin dry.
Test either approach on shorter walks first so you know how your feet respond.
Finally, build up your mileage gradually. Regular walking conditions your skin,
and feet that are used to long days handle them far better than feet that spend most of the week in office shoes.
Treat Hot Spots the Moment You Feel Them
A hot spot is a warm, stinging or tender area that signals a blister is starting.
This is the single most important moment in blister prevention.
Stop right away, even if the group is moving and you would rather not slow everyone down,
because a five-minute fix now can save hours of pain later.
- Take off your shoe and sock and look at the area.
- Remove anything that might be rubbing, such as grit, a sock wrinkle or a twisted insole.
- Dry the skin thoroughly.
- Cover the spot with tape, a blister dressing or padding.
- Fix the cause by adjusting your lacing, changing into dry socks or tightening your laces before a long descent.
If you hike with others, agree before you start that anyone can call a quick stop for a hot spot.
Many blisters happen simply because someone did not want to hold up the group.
Manage Moisture on the Move
Because damp skin blisters more easily, keeping your feet dry is a big part of prevention.
At longer breaks, take off your shoes and socks and let your feet air out in the sun or breeze.
Swap in your spare socks when the first pair gets damp, and hang the wet pair on the outside of your pack to dry.
Low gaiters keep sand, grit and small stones out of your shoes, which helps on dusty or loose trails.
In hot weather, breathable, non-waterproof footwear can keep your feet cooler and drier than a waterproof boot.
At stream crossings, decide whether to keep your shoes on for grip or switch to sandals, but dry your feet carefully afterward either way.
If a Blister Forms Anyway
Many medical sources advise leaving a small, intact blister alone, because the unbroken skin protects against infection.
Cover it with a blister dressing, or cut a ring of padding so the hole sits around the blister,
then tape over it so it cannot rub.
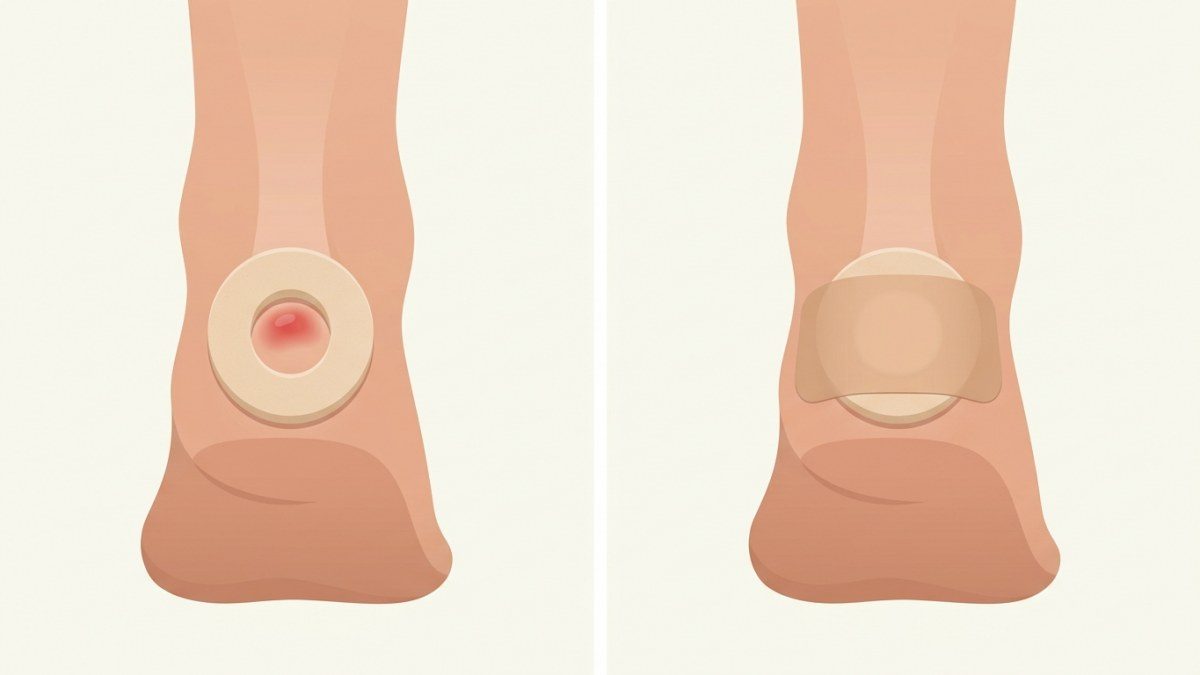
If a blister tears open, clean the area gently, cover it with a clean dressing and keep an eye on it.
Seek medical care if you notice spreading redness, warmth, swelling, pus, red streaks, fever or increasing pain, which can be signs of infection.
People with diabetes or circulation problems should get medical advice for any foot blister rather than treating it on their own.
Frequently Asked Questions
Should I pop a blister on the trail?
In general, no. An intact blister acts as a natural, clean bandage over the raw skin underneath.
Protect it with padding and tape and let it heal, and if one is very large,
painful or likely to burst, ask a medical professional about the safest approach.
Do liner socks really help?
They help some hikers a great deal and others not at all.
Liners move friction away from your skin, but they also add bulk inside your shoe.
Try them on a few shorter hikes before a big trip.
Why do my toes blister on long descents?
On steep downhill stretches, your foot slides forward and your toes press into the front of the shoe.
Tighten your laces before descending, keep your toenails short, and check that your shoes have enough length for your feet.
Happy Feet, Happy Miles
Blister prevention is a set of small habits: footwear that fits, good socks, dry skin,
pre-taped trouble spots and quick action at the first hint of a hot spot.
Build those habits into every hike, and your feet will carry you farther with a lot less pain.
Sources and Further Reading
This article was reviewed by the BraverPlay editorial team against the official sources below. Rules, conditions and gear vary from place to place, so always check the latest guidance from local authorities before you head out.
- Blisters, NHS: Not bursting a blister, covering it with a padded dressing, the signs of an infected blister, and well-fitting shoes with moisture-wicking socks.
- How to prevent and treat blisters, American Academy of Dermatology: Moisture-wicking or double socks, moleskin on problem areas, donut-shaped padding around a blister and when to see a doctor.
- Care for Your Feet: How to Prevent and Treat Injuries on Trail, Washington Trails Association: Taping known trouble spots before hiking, stopping at the first hot spot, liner and toe socks, and cutting a hole in moleskin around a blister.