
Anúncios
A daypack that is packed well barely registers on your back.
One that is packed badly sways with every step, digs into your shoulders,
and forces you to empty half of it to find your rain jacket when the first drops fall.
Anúncios
How you pack matters as much as what you pack.
This guide walks through choosing a pack that fits, where each item should go,
and how to adjust the straps so the load rides steady from the trailhead to the summit and back.
Start With a Pack That Fits
For most day hikes, a pack of roughly 20 to 30 liters holds water, food, layers and the essentials without inviting you to overpack.
Short summer walks can get by with less, while winter hikes and long days with bulky layers often need more room.
Capacity is only part of the equation. A pack should match your torso length,
which runs from the prominent bone at the base of your neck to the top of your hip bones,
rather than your overall height.
Look for a padded hip belt on anything you will carry for long, since your hips are far better at carrying weight than your shoulders.
A back panel with some structure and ventilation helps the pack hold its shape and keeps your back cooler.
If you can, try packs on with some weight inside. An empty pack feels comfortable on almost anyone,
while a loaded one quickly reveals straps that rub or a hip belt that sits in the wrong place.
Lay Everything Out First
Before you pack, spread everything on the floor.
Seeing it all at once helps you spot what you forgot and what you do not need. Group items by when you will use them: things you need constantly,
things you might need at any moment, and things you hope not to need at all.
Then load the pack in a consistent order.
If you use a hydration reservoir, fill it and slide it into its sleeve first,
since fitting a full reservoir into a full pack is a struggle.
Next come the bottom items, then the heavy middle, then the quick-access top, and finally the lid and pockets.
Pack the same way every time.
When you always know that the headlamp lives in the lid and the first aid kit sits at the top of the main compartment,
you can find them in seconds, even in the dark or with cold hands.
A Place for Everything
Think of your pack as a set of zones, each suited to different items:
| Zone | What goes there |
|---|---|
| Bottom of the main compartment | Light, bulky items you will not need until a long break, such as a puffy jacket or spare socks |
| Middle, against your back | The heaviest items, such as a hydration reservoir, lunch and extra water |
| Top of the main compartment | Things you may need quickly, such as a rain jacket, first aid kit and warm hat |
| Lid or top pocket | Small essentials, such as a headlamp, map, compass, sunscreen, knife and toilet kit |
| Hip belt pockets | Snacks, phone, lip balm and anything you reach for while walking |
| Side and front pockets | Water bottles, a wet rain jacket, trekking poles or a sit pad |
Keep your navigation tools and snacks where you can reach them without taking the pack off.
If getting to something requires a full stop, you will be tempted to skip it,
and that is how people end up hungry, dehydrated or off route.
Keep Heavy Items Close and Centered
The most important packing principle is simple: put the heaviest items close to your spine and roughly between your shoulder blades.
Weight that sits far from your back acts like a lever, pulling you backward and forcing you to lean forward to compensate.
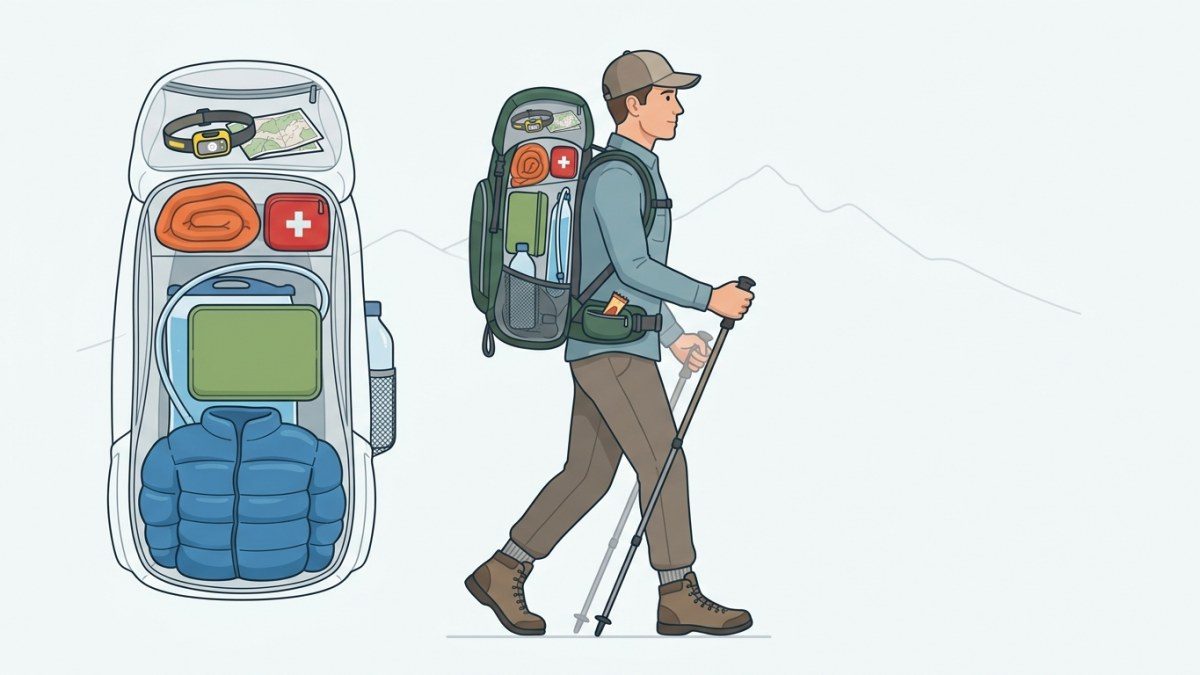
- Balance weight evenly from side to side, so the pack does not pull you off center.
- Fill empty spaces with soft items, such as a hat or gloves, so the contents cannot shift.
- Cinch the compression straps to pull the load tight against your back.
- Avoid hanging heavy items on the outside, where they swing and snag on branches.
- Seal sunscreen, insect repellent and anything else that might leak in a separate bag, and keep it upright and away from food and clothing.
- Keep hard or sharp objects, such as a metal flask or a multi-tool, away from the back panel so they cannot press into you.
Protect What Must Stay Dry
Few daypacks are fully waterproof, and rain covers leave the back panel exposed, so water can still seep in.
The easiest fix is a waterproof pack liner or a sturdy plastic bag lining the main compartment.
Put your insulating layer, spare socks and anything else that must stay dry inside it.
Keep your phone, spare battery and paper map in a small waterproof pouch or zip-top bag.
Carry your rain jacket outside the liner, near the top, so you can grab it without exposing everything else to the weather.
Adjust the Straps in the Right Order
Even a perfectly packed bag will feel wrong if the straps are adjusted poorly.
Put the pack on with every strap loosened, then work through these steps:
- Hip belt: Center the padded belt over the top of your hip bones and tighten it snugly, so it carries much of the weight.
- Shoulder straps: Pull them until they wrap your shoulders comfortably without lifting the weight off your hips.
- Load lifters: If your pack has small straps at the top of the shoulder straps, tighten them gently to pull the load toward your body.
- Sternum strap: Clip it across your chest at a comfortable height and snug it enough to keep the shoulder straps in place without restricting your breathing.
Small tweaks through the day help. Snug everything down before a rough descent so the pack does not shift,
and move a little weight between your hips and shoulders now and then to rest tired muscles.
Smaller daypacks may have a simple webbing belt instead of a padded one, and on those, the shoulder straps will carry more of the load.
Troubleshooting a Pack That Hurts
If something aches, the pack is usually telling you what to fix:
- Sore shoulders: The hip belt is probably too loose or too low. Move it up onto your hip bones and tighten it.
- Pack pulls you backward: Heavy items are too far from your back. Repack them closer to your spine and tighten the compression straps.
- Pack sways side to side: The weight is uneven or loose. Rebalance the load, fill gaps and tighten the straps.
- Something digs into your back: A hard object is pressing through. Move it and pad that side with soft clothing.
- Numb or tingling hands or arms: The shoulder straps or sternum strap may be too tight. Loosen them and let the hip belt take more weight.
If problems persist after adjusting, the pack may not suit your torso length or body shape,
and a better-fitting model may make more difference than any packing trick.
Lightening the load helps too, so after each hike, take out anything you carried but never used and did not need for safety.
Load Up and Go
A comfortable daypack comes from three habits: choosing one that fits,
packing heavy items close to your back with quick-access gear on top, and adjusting the straps from the hips up.
Pack the same way every time, and you will spend less time fiddling with your load and more time enjoying the trail.
Sources and Further Reading
This article was reviewed by the BraverPlay editorial team against the official sources below. Rules, conditions and gear vary from place to place, so always check the latest guidance from local authorities before you head out.
- How to Choose a Backpack, Washington Trails Association: Day pack sizes, fitting by torso length, and adjusting hip belt, shoulder straps, load lifters and sternum strap in that order.
- How to Pack a Backpack, American Hiking Society: Keeping heavy items close to your back and centered, essentials in easy-to-reach pockets, a plastic liner for dry gear, and tightening the hip belt first.
- Ten Essentials, U.S. National Park Service: The essentials a day pack should carry: navigation, light, first aid, extra layers, food and water.